The Aromatic Delight You Can’t Resist
Ever walked into a kitchen where something so cozy simmered on the stove that you felt instantly at home? That’s the feeling you’ll get with One-Pan Honey Butter Garlic Chicken & Rice. Crackly, savory chicken, sweet honey notes, and the warmth of garlic — it’s a comfort food dream all in one pan! Plus, it’s a total crowd-pleaser, making it perfect for busy weeknights or those ‘just because’ dinners.
Why Make This Recipe
Why not whip this up for dinner tonight? Here’s why you’ll love it:
- Easy Cleanup: Who wants to tackle a mountain of dishes after a long day? This one-pan wonder eliminates the fuss.
- Family-Friendly: It’s not just easy; it’s delicious! Your picky eaters won’t even grumble. Trust me.
- Budget-Friendly: With basic ingredients and flavorful results, it’s a win for your wallet too. Saving money and enjoying good food? Yes, please!
Ingredients:
You don’t need fancy stuff — just these basics!
- 4 chicken thighs
- 1 cup rice
- 1/4 cup honey
- 1/4 cup butter
- 4 cloves garlic, minced
- 2 cups chicken broth
- Salt and pepper to taste
- Optional: chopped parsley for garnish
Directions:
Let’s dive into how to make this scrumptious meal.
- In a large skillet, melt the butter over medium heat.
- Season the chicken thighs with salt and pepper; sear them in the skillet until golden brown on both sides.
- Add garlic and honey to the skillet, stirring to combine those delicious flavors.
- Pour in the chicken broth and bring it to a simmer.
- Stir in the rice, cover, and reduce heat to low.
- Cook for about 20 minutes or until the rice is fluffy and the chicken is cooked through.
- Serve hot, garnished with minced parsley if desired.
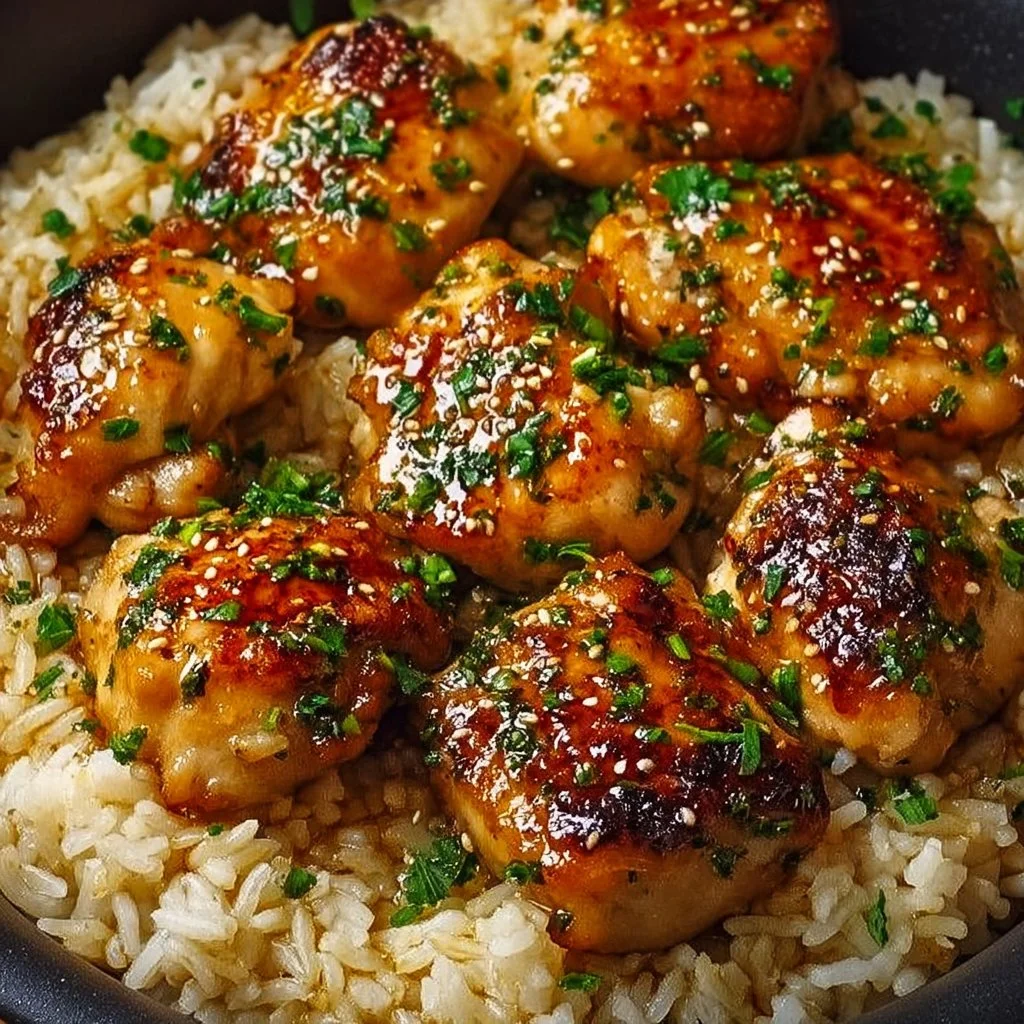
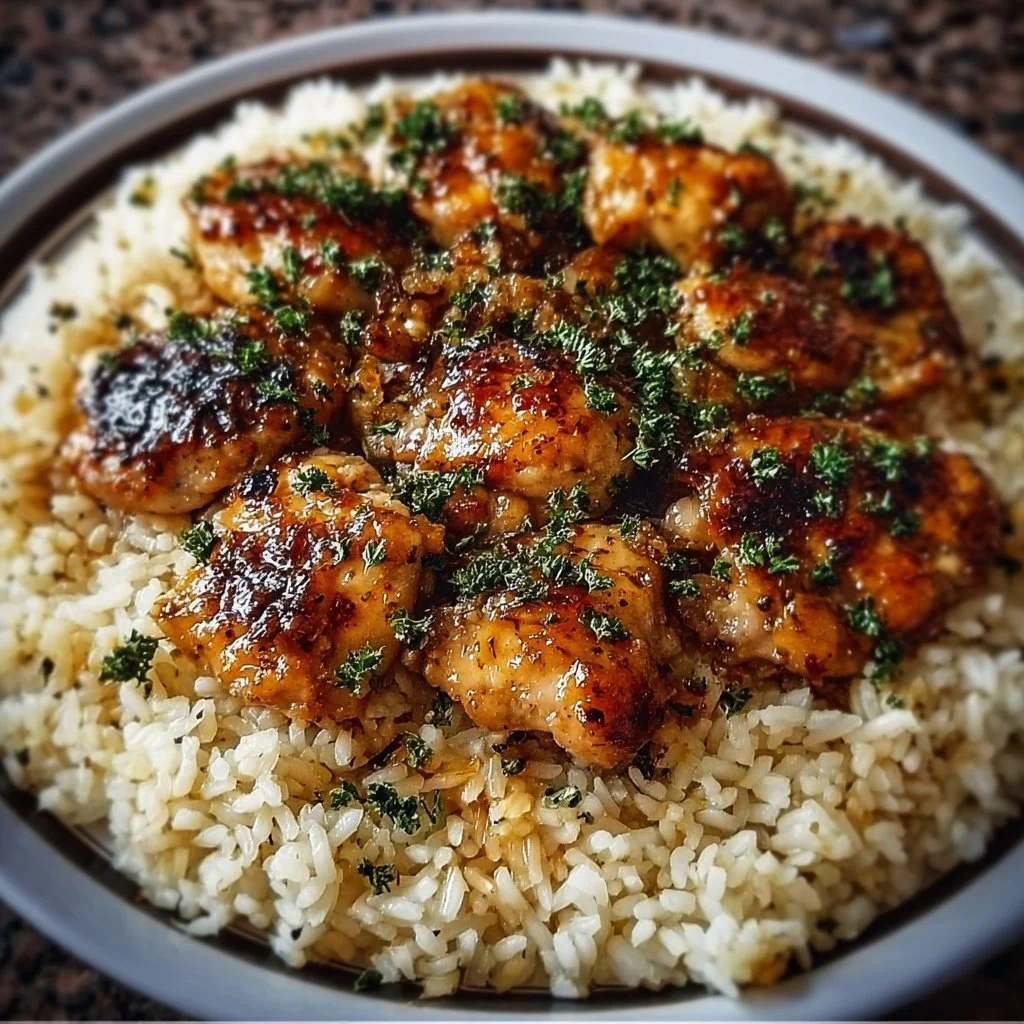
How to Make One-Pan Honey Butter Garlic Chicken & Rice (Overview)
Cooking this dish is as easy as pie — or in this case, easy as chicken and rice! Start with searing those chicken thighs to lock in flavor. Then, as the garlic and honey mingle together, the irresistible aroma will take over your kitchen. Pour in the chicken broth, toss in the rice, and let it work its magic. Pro tip? Don’t skip toasting the garlic — that little step brings out an amazing depth of flavor that’ll have everyone begging for seconds!
How to Serve One-Pan Honey Butter Garlic Chicken & Rice
Plate this up and brace yourself for compliments! The rich golden-brown chicken pairs beautifully with the fluffy rice. Drizzle a bit of that honey garlic sauce over the top, and sprinkle on some fresh parsley for a pop of color. The warm, savory aroma will spark hunger in anyone nearby. Serve it alongside roasted veggies or a simple salad for an extra crunch and vibrant contrast.
How to Store One-Pan Honey Butter Garlic Chicken & Rice
Leftovers? Yes, please! Store your One-Pan Honey Butter Garlic Chicken & Rice in an airtight container in the fridge for up to 3-4 days. If you want to keep it longer, toss it in the freezer — it’ll last for about 2-3 months! For reheating, the microwave or stove works well, just sprinkle a splash of water on the rice to keep it from drying out.
Tips to Make One-Pan Honey Butter Garlic Chicken & Rice
Here’s some insider info to elevate your cooking game:
- Use boneless chicken thighs for extra tenderness and quicker cooking.
- Swap in brown rice if you want a nuttier flavor and added nutrition (just note it may need a bit more cooking time).
- For those who love a kick, add a dash of red pepper flakes to the honey and garlic mixture. 🔥
- If you feel adventurous, toss in some frozen veggies during cooking for a pop of color and nutrients.
Variation
Feeling like mixing things up? You can dial in different flavors easily! Try using maple syrup instead of honey for a fall-inspired twist or add a splash of soy sauce for an Asian touch. Going vegan? Sub the chicken for tofu, and use vegetable broth – it’s just as delicious!
FAQs
Can I use chicken breast instead of thighs?
Absolutely! Just keep in mind that breasts might dry out faster, so keep an eye on the cooking time.
Can I make this dish ahead of time?
Yes! Prep it earlier in the day and let the flavors meld. Just reheat when you’re ready to serve.
Can I freeze leftovers?
You bet! Store them in an airtight container, and they’ll be good for a couple of months.
📌 Pin this recipe for your next cozy dinner night!
One-Pan Honey Butter Garlic Chicken & Rice
Ingredients
Method
- In a large skillet, melt the butter over medium heat.
- Season the chicken thighs with salt and pepper; sear them in the skillet until golden brown on both sides.
- Add garlic and honey to the skillet, stirring to combine those delicious flavors.
- Pour in the chicken broth and bring it to a simmer.
- Stir in the rice, cover, and reduce heat to low.
- Cook for about 20 minutes or until the rice is fluffy and the chicken is cooked through.
- Serve hot, garnished with minced parsley if desired.