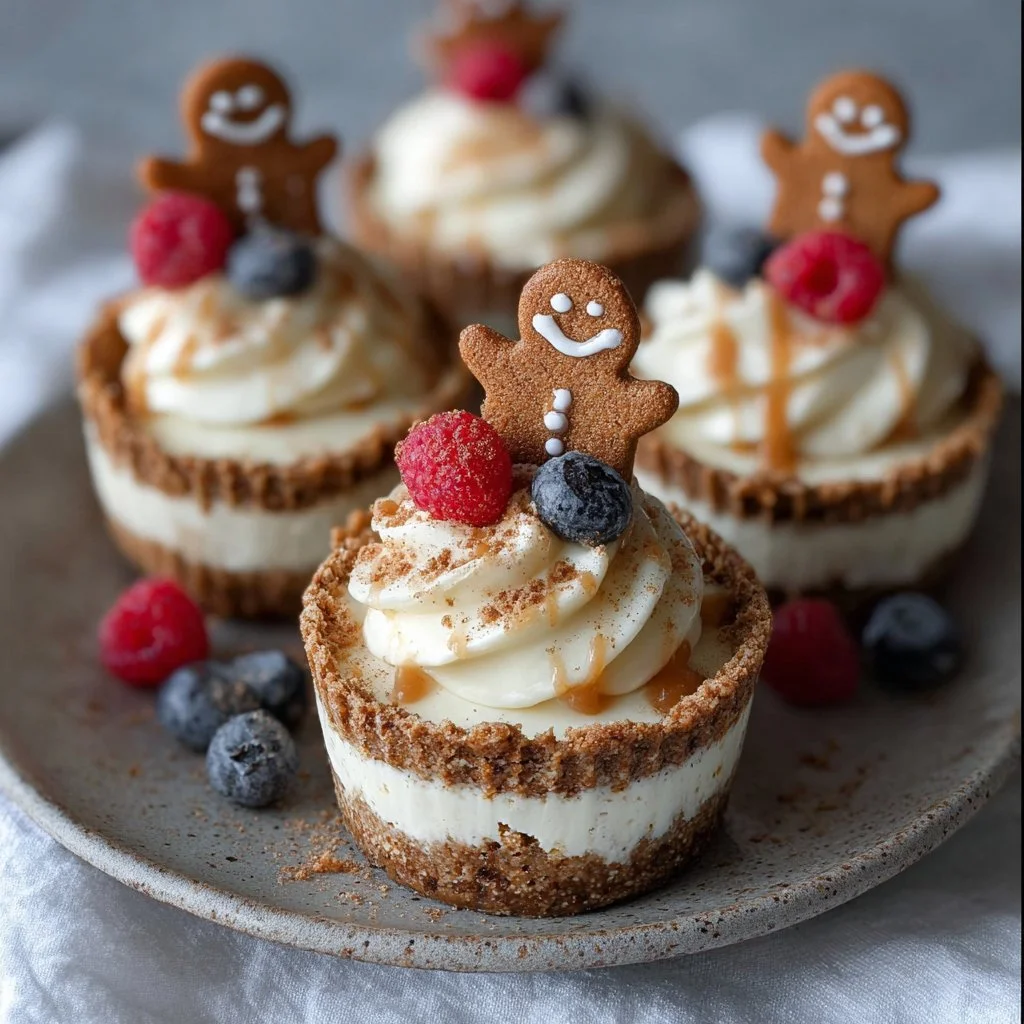
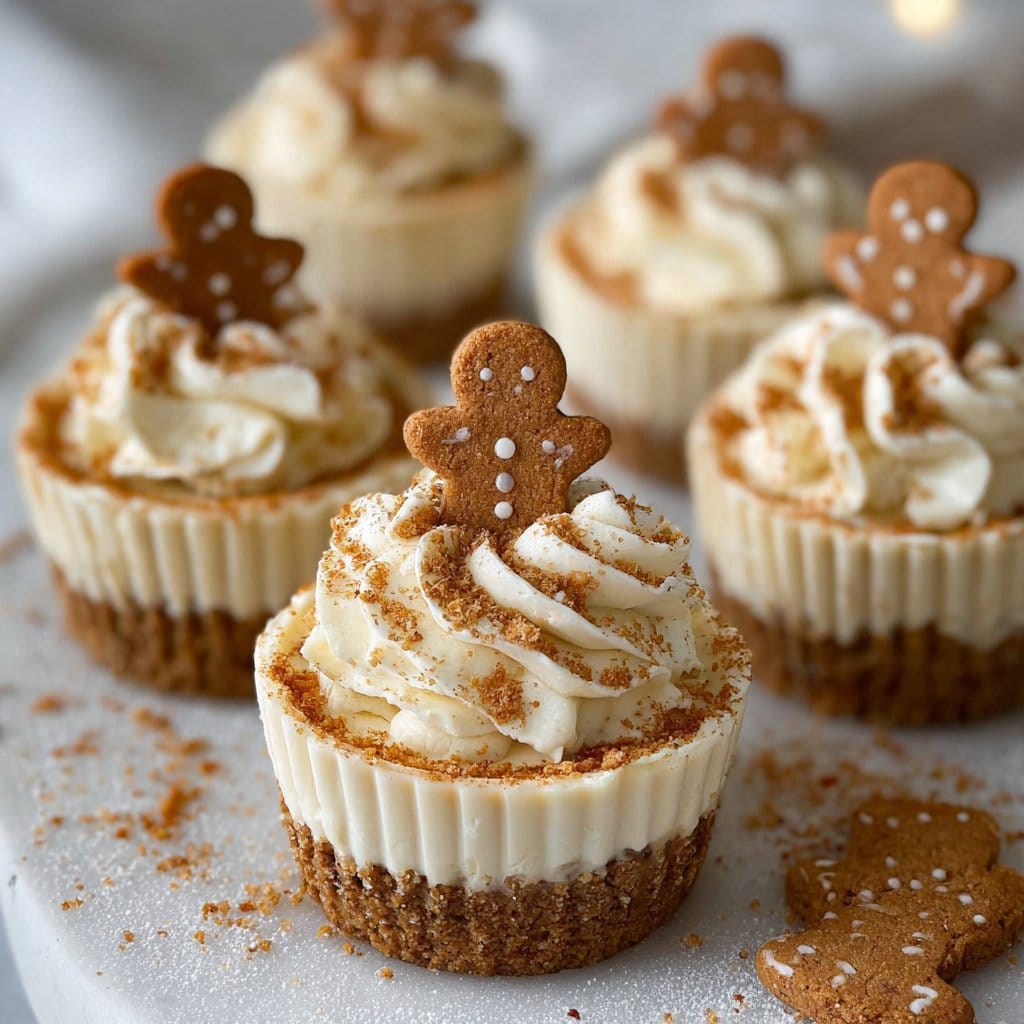
A Sweet Treat Without the Heat
Ever dreamed of a dessert that delivers the festive flavors of gingerbread without cranking up the oven? Say hello to No-Bake Gingerbread Cheesecake Cups! These creamy cups are rich with warm spices, making them the perfect treat for cozy evenings or holiday gatherings. Plus, they come together in no time and require just a few simple ingredients. Trust me, you’ll want to dive right in!
Why Make This Recipe
If you love desserts that are easy to whip up and even easier to enjoy, this recipe is for you. Picture this: no baking means no scorching the oven (hello, summer heat!) and way less cleanup. Did I mention they’re family-friendly? Kids will love getting their hands (or spoons) into these delightful cups, and you’ll love how quickly they disappear! Plus, you’ll sound like a culinary genius when you say you made cheesecake from scratch—no one needs to know it’s no-bake. 😉
Ingredients
You don’t need fancy stuff — just these basics!
- 1 1/2 cups gingerbread cookie crumbs
- 1/4 cup unsalted butter, melted
- 16 oz cream cheese, softened
- 1/2 cup powdered sugar
- 1 teaspoon ground ginger
- 1/2 teaspoon ground cinnamon
- 1 teaspoon vanilla extract
- 1/2 cup whipped cream
Directions
Get ready to indulge! Follow these simple steps:
- Combine gingerbread cookie crumbs and melted butter in a bowl until the mixture resembles wet sand.
- Press the crumb mixture evenly into the bottom of your serving cups or glasses.
- In a separate bowl, beat the softened cream cheese and powdered sugar until smooth.
- Add ground ginger, cinnamon, and vanilla extract to the cream cheese mixture and mix well.
- Fold in the whipped cream gently until combined—no overmixing!
- Spoon or pipe the cream cheese filling over the crust in each cup.
- Refrigerate for at least 2 hours before serving to let them set.
- Garnish with additional spices or whipped cream if desired before serving.
How to Make No-Bake Gingerbread Cheesecake Cups (Overview)
This process really couldn’t be easier! You start off by making a deliciously spiced crust with gingerbread cookies and butter—think of it as your golden foundation. Next, whip up the creamy filling, folding in whipped cream for that ultra-smooth texture. Layer them up, chill for a bit, and voilà! Just like that, you have yourself a festive dessert that makes you look like a rockstar chef. Pro tip: Don’t rush the chilling time; it’s crucial for the right texture.
How to Serve No-Bake Gingerbread Cheesecake Cups
Unveil these cups and watch them disappear! Imagine serving them atop a festive table, garnished with a sprinkle of ground cinnamon and a dollop of fluffy whipped cream. The contrast of creamy cheesecake against the crunchy crust gives a delightful texture that’s just irresistible. 😊 Pair them with a spiced chai latte or a cozy hot cocoa, and you’re in for a treat that warms the soul.
How to Store No-Bake Gingerbread Cheesecake Cups
Got leftovers? Lucky you! These treats can keep in the fridge for up to 3 days. Just cover them well before placing them in a sealed container. For longer storage, you could freeze them, but let’s be real—who wants to wait that long for such goodness? If you plan to make them ahead of time, enjoy them fresh after a 2-hour chill and thank yourself later!
Tips to Make No-Bake Gingerbread Cheesecake Cups
- Beat your cream cheese until silky to avoid lumpiness—nobody wants that!
- Use fresh spices for maximum flavor. Your nose will thank you when you smell that ginger!
- Don’t skip the chilling time; it truly helps the flavors meld beautifully.
- Make them mini for bite-sized delights—perfect for parties!
- Try making the crust with different cookies, like Oreos, for a fun twist!
Variation
Looking to switch it up? Try adding pumpkin puree to the filling for a fall-inspired delight or experiment with peppermint extract around the holidays. Want it vegan? Swap in plant-based cream cheese and coconut whipped cream for a lighter option that still brings the cheer!
FAQs
Can I make these ahead of time? Absolutely! They chill wonderfully, so you can make them a day in advance.
How do I store leftovers? Keep them in the fridge for up to three days or freeze for longer storage—though they’re unlikely to last that long!
What can I use instead of gingerbread cookies? Try graham crackers, Oreos, or any of your favorite sweet cookies as a crust substitute.
📌 Pin this recipe for your next cozy dinner night!

No-Bake Gingerbread Cheesecake Cups
Ingredients
Method
- Combine gingerbread cookie crumbs and melted butter in a bowl until the mixture resembles wet sand.
- Press the crumb mixture evenly into the bottom of your serving cups or glasses.
- In a separate bowl, beat the softened cream cheese and powdered sugar until smooth.
- Add ground ginger, cinnamon, and vanilla extract to the cream cheese mixture and mix well.
- Fold in the whipped cream gently until combined—no overmixing!
- Spoon or pipe the cream cheese filling over the crust in each cup.
- Refrigerate for at least 2 hours before serving to let them set.
- Garnish with additional spices or whipped cream if desired before serving.